2021-09-11 来源:网络
今天我们来讲解一个通过FLASH AS3来制作特酷的遮罩动画效果的教程,先看一下最终效果吧:
这里以FLASH CS4来讲解,具体制作步骤如下:
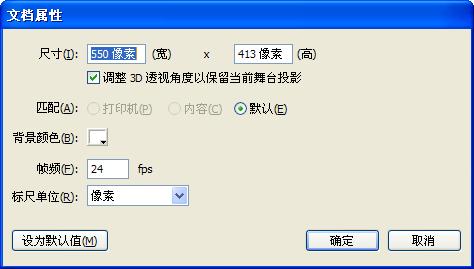
步骤一、打开FLASH CS4,新建一个FLASH文档,选择AS3,然后按Ctrl+J进行文档属性设置,把文档的高度、宽度分别设置为550×314(这个大小与背景图片大小相同),如图:
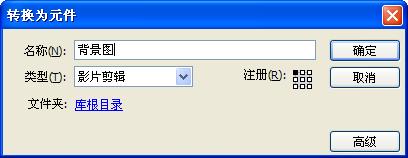
步骤二、导入作为背景图片,选中背景图片,按下【F8】,转为【影片剪辑】,名称填写【背景图】,这个名称你可以自己任意填写名称,点【确定】,如图所示:
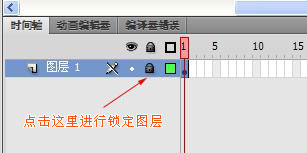
接着对这个有背景图的图层进行锁定,如图:
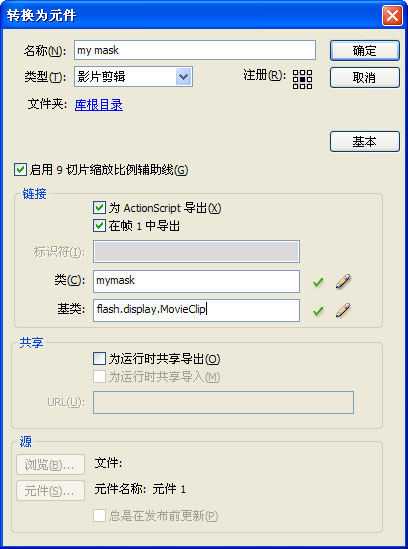
步骤三、新建一个图层,取个名称遮罩层,然后椭圆工具画一个禁止笔触为50*50的圆,填充黑色(其实这里可以填充任何一种颜色),然后按F8,把这个圆转为影片剪辑,名称设为mask,如图所示:
步骤四、删除舞台中的这个圆,把该图层改名为AS。
步骤五、新建ActionScript文件,编写一个外部的MyMask.as文件。在编译器中输入代码如下:
package {

 import flash.display.MovieClip;

 public class MyMask extends MovieClip {

  //Mask's x and y speed
  public var speedX:Number;
  public var speedY:Number;

  //Set the given scale for this mask, when we create a new
  //mask object
  public function MyMask(scale:Number) {
   this.scaleX = scale;
   this.scaleY = scale;
  }
 }
}
步骤六、转到flash中的as层,输入如下as代码:
	//We use an array to hold all our masks.

	//(Except the mask that follows our cursor)

	var masks:Array = new Array();


	//We add all of the masks to a container

	var maskContainer:Sprite = new Sprite();


	//Set the maskContainer to be the image's mask

	backgroundImage.mask=maskContainer;


	//Add the container on the stage

	addChild(maskContainer);


	//Create the mask which follows cursor movement (master mask)

	var masterMask:MyMask=new MyMask(1);


	//Set the master masks's coordinates to match cursor's coordinates

	masterMask.x=mouseX;

	masterMask.y=mouseY;


	//Add the master mask to a container

	maskContainer.addChild(masterMask);


	//Cache the image and container as bitmap, so we

	//can animate the alpha of the masks

	maskContainer.cacheAsBitmap=true;

	backgroundImage.cacheAsBitmap=true;


	//Create a timer that is called every 0.2 seconds

	var timer:Timer=new Timer(200,0);

	timer.addEventListener(TimerEvent.TIMER, timerEvent);

	timer.start();


	//This function is called every 0.2 seconds.

	//We create a new mask in this function.

	function timerEvent(e:TimerEvent):void {


	 //Calculate a random scale for the new mask (0 to 1.5)

	 var scale:Number=Math.random()*1.5 + 0.5;


	 //Create a new mask with random scale

	 var newMask:MyMask=new MyMask(scale);


	 //Set the position for the new mask

	 newMask.x=mouseX;

	 newMask.y=mouseY;


	 //Assign a random x and y speed for the mask

	 newMask.speedX=Math.random()*20-10;

	 newMask.speedY=Math.random()*20-10;


	 //Add the mask to the container

	 maskContainer.addChild(newMask);


	 //Add the mask to the array

	 masks.push(newMask);

	}


	//We need ENTER_FRAME to animate the masks

	addEventListener(Event.ENTER_FRAME, enterFrameHandler);


	//This function is called in each frame

	function enterFrameHandler(e:Event):void {


	 //Loop through the mask array

	 for (var i:uint = 0; i < masks.length; i++) {


	  //Save a mask to a local variable

	  var myMask:MyMask = (MyMask)(masks[i]);


	  //Update the x and y position

	  myMask.x+=myMask.speedX;

	  myMask.y+=myMask.speedY;


	  //Increase the scale

	  myMask.scaleX+=0.1;

	  myMask.scaleY+=0.1;


	  //Reduce the alpha

	  myMask.alpha-=0.01;


	  //If the alpha is below 0, remove the mask

	  //from the container and from the array

	  if (myMask.alpha<0) {

	   masks.splice(i,1);

	   maskContainer.removeChild(myMask);

	  }

	 }


	 //Update the master mask position

	 masterMask.x=mouseX;

	 masterMask.y=mouseY;

	}
至此,整个用AS3制作的特酷的遮罩动画效果动画就制作完成了,你可以按Ctrl+Enter进行测试。
感兴趣的朋友可以直接下载flash源码研究一下。
相关文章